In this guide, we’ll show you how to easily create and send an invoice using Cordlo.
Whether you’re a freelancer, small business owner, or service provider, Cordlo makes it super simple to send professional invoices in just a few clicks.
Let’s get started!
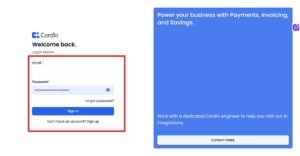
Step 1: Sign Up or Log In to Cordlo
If you’re new to Cordlo, the first thing you need to do is sign up for an account.
- Go to the Cordlo website.
- Click the “Get Started” or “Sign In” button.
- Fill in your business or personal details.
If you already have an account, just click “Sign In” and enter your email and password.
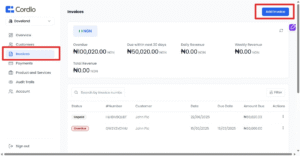
Step 2: Go to the Invoices Page
From the dashboard, look at the left-hand menu and click on “Invoices.”
This will take you to the Invoices page, where you can see a list of all your invoices.
At the top right of the Invoices page, click on the “Add Invoice” button.
This will take you to the invoice editor — where the magic happens.
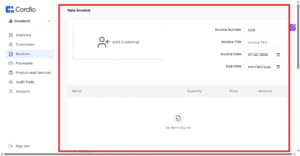
Step 3: Fill Out Your Invoice Details
Here, you’ll customize your invoice with all the important information:
- Invoice Number: You can change this to match your own numbering system.
- Due Date: Choose when the payment should be made.
- Currency: Select the currency for the invoice.
- Customer: Add a new customer or select one from your existing list.
- Items: Add each product or service you’re billing for.
- Include quantity, rate, and description.
- Tax & Extra Charges: Apply tax rates or add other charges like shipping or handling.
- Discount: Add any discount you’re offering.
- Signature: Upload or insert your saved digital signature.
- Footer Note: Include payment instructions, thank-you notes, or terms.
Take your time to review everything to make sure it looks just right.
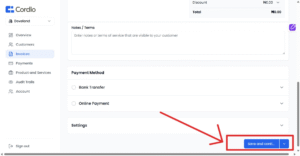
Step 4: Save or Send the Invoice
Once your invoice is ready, you have two options:
- Click “Save and Continue” to keep it as a draft.
- Or click the dropdown arrow beside the save button and choose “Save and Send Invoice.”
If you send it, Cordlo will email the invoice directly to your customer.
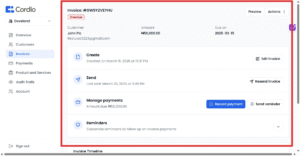
Step 5: View Your Invoice
After saving or sending the invoice, you’ll be redirected to the Invoice Detail Page.
From here, you can:
- Preview the invoice
- Download it as a PDF
- Edit or update any part of it
- Resend to your customer
🎉 And That’s It!
You’ve just created a professional invoice with Cordlo!
Cordlo makes invoicing super easy, even if you’re not a tech expert. Now you can get paid faster and keep your business running smoothly.